Introduction
Securing your application is a critical part of development, especially for APIs. In NestJS, you can enhance security by leveraging middleware and guards to handle requests and control access. Both middleware and guards can be customized to fit the specific needs of your application.
This blog post will explore how to create middleware and guards in NestJS to enhance the security of your APIs.
Middleware in NestJS
- Nest JS middleware functions are interceptors of incoming HTTP requests and outgoing responses. They allow you to process requests globally or at specific points in your application’s request/response cycle. Middleware is a tool that can perform tasks like request/response transformation, error handling, etc.
- Intercepting a request can allow you to read all the information in the request itself and determine whether or not to terminate the process.
- Middleware runs before the main route handler (controller method) is called, allowing you to perform certain tasks before the main processing of the request takes place. You can apply middleware globally across your entire application, on specific routes, or even on individual route handlers.
- Middleware functions are called before the route handlers, and they can either terminate the request/response cycle or pass control to the next handler.
- Middleware functions act as intermediaries that handle both incoming HTTP requests and outgoing responses.
- They have the ability to access and modify the request and response data directly.
Common Use Cases for Middleware:–
- Logging requests
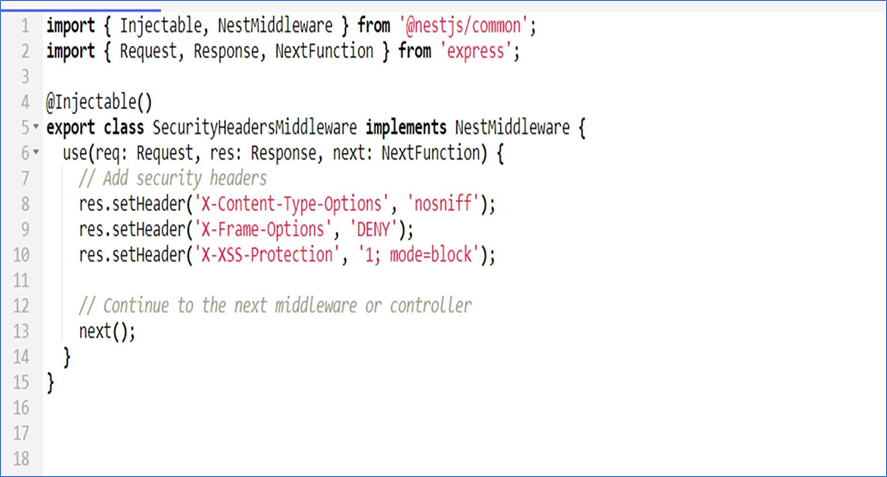
- Adding security headers
- Input validation or sanitization
- Request throttling
- Authentication checks
Example of a middleware:–
Guards in NestJS
- NestJS Guards are commonly used to secure routes from unauthorized access or to make decisions using information like user roles or JWT tokens.
- Middleware manages general request processing, while guards are used specifically for checking authorization and access control. Guards decide whether a request can proceed by verifying things like user roles or if the user is authenticated.
- Guards are created using the CanActivate or CanActivateContext interface, and they either return true to grant access or false to block it. You can also throw an exception if the user is not authorized.
- Guards mainly focus on controlling access and handling authentication for specific routes.
- They are used on routes or route handlers to decide if a request should be allowed to reach the route.
- Unlike middleware, guards don’t directly interact with the request or response objects.
- Guards can access the route’s context and use information like user roles or JWT tokens to make decisions.
- If a guard returns false or throws an exception, it stops the request from reaching the route handler.
Common Use Cases for Guards:–
- Role-based access control (RBAC)
- Authorization based on JWT tokens
- IP whitelisting/blacklisting
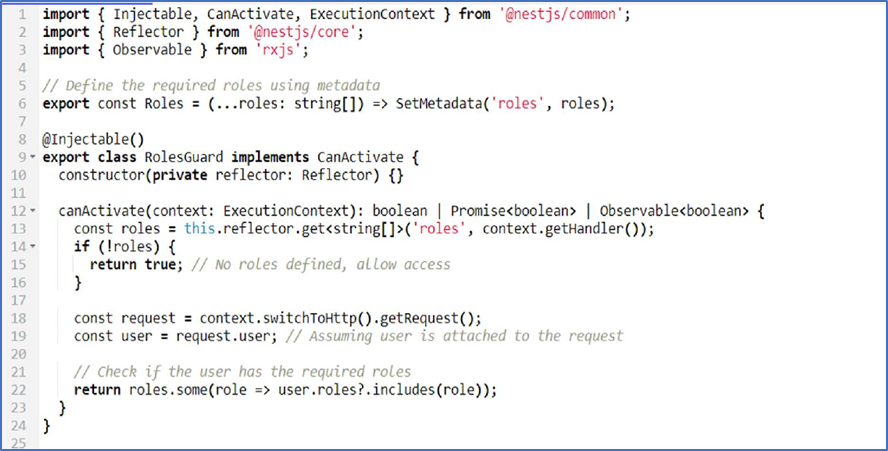
Example of Guard:–
Let’s create a custom guard to implement role-based access control (RBAC). This guard will check if the current user has the required roles to access a route.
Using the Guard:–
To use the guard, you’ll need to apply it to your route handlers or controllers. Here’s an example where only users with the admin role can access the route:

Best Practices for Middleware and Guards:–
- Avoid Heavy Processing in Middleware: Use middleware for simple tasks like logging, setting security headers, or cleaning up input data. Avoid doing heavy processing in middleware to prevent slowing down requests.
- Use Guards Wisely: Apply guards only when necessary to keep your code organized and efficient.
- Use Global Guards for Authentication: If your app requires authentication, using global guards ensures that all routes check for it.
- Chain Middleware and Guards: Use middleware and guards together for better security. Middleware can sanitize data, while guards can control access based on the sanitized data.
Which is executed first?
In NestJS, middleware runs before guards.
When a request is made to a route, the order of execution is:
Middleware → Guards → Route Handler
Conclusion
By creating custom middleware and guards, you can strengthen the security of your NestJS application.
Middleware makes sure that every request is handled in a secure environment, while guards check for proper access based on roles or authentication. Together, they provide a robust way to secure your application while maintaining flexibility.